The RANO workflow is now officially available on the QMENTA platform. It allows for manual caliper placement to measure brain lesions and to perform longitudinal analysis.
The RANO workflow consists of 3 steps:
- Data filtering and preselection
- Analyzing a baseline session using the RANO assessment tool
- Analyzing a follow-up session
1. Data filtering and preselection tools
A manual step asks the user to select the post-contrast T1 MRI to be used to perform the RANO assessment.
The RANO assessment tool will show two MRIs side by side. In this screen, you can see the viewer image selectors on the top left to change the image to visualize on each side.
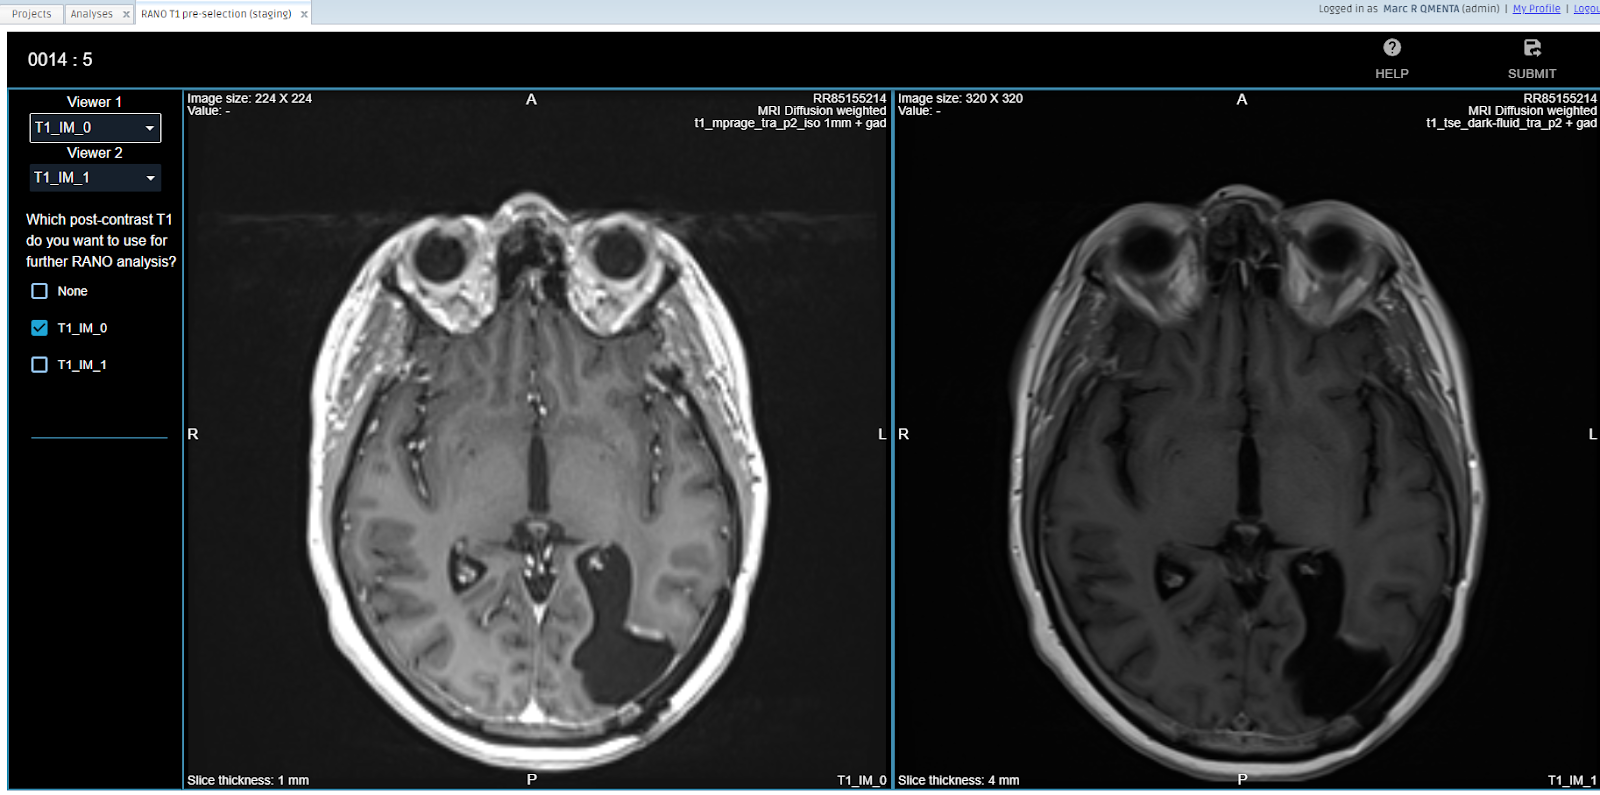
Select in the checkbox list the T1 post contrast that is going to be used for the RANO assessment and click on Submit. You can see in the bottom right corner of each window which image corresponds to the selection (example T1_IM_0 or T1_IM_1).
2. Analyzing a baseline session using the RANO assessment tool
This step is divided in 3 further substeps
Short questionnaire
The viewer collects all the T1w and T2w images from the current session. Click on the checkboxes on the left answering the questions, after inspecting the presented images.
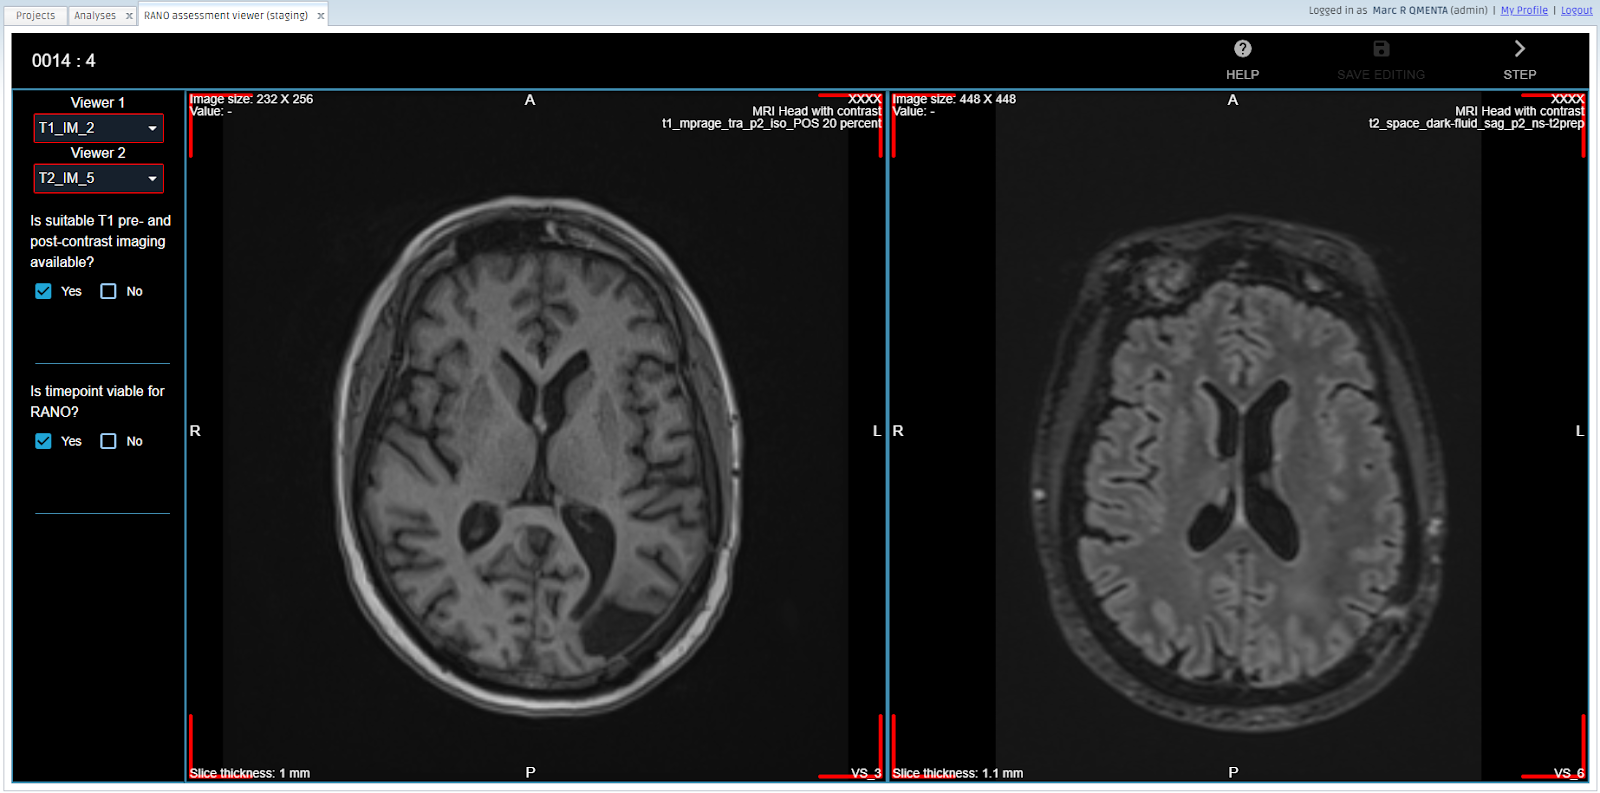
After selecting the answers on the left side, click on the "STEP" button on the top right corner.
Measuring the lesions
On the next substep you will be presented with another side-by-side configuration. Besides the MRIs it also includes the RANO form in the drop-down list, which is empty in the baseline case. You can also select the different images using the view selectors on the top left.

Answer the questions on the left side by checking the checkboxes. These two questions are important for a successful RANO analysis.
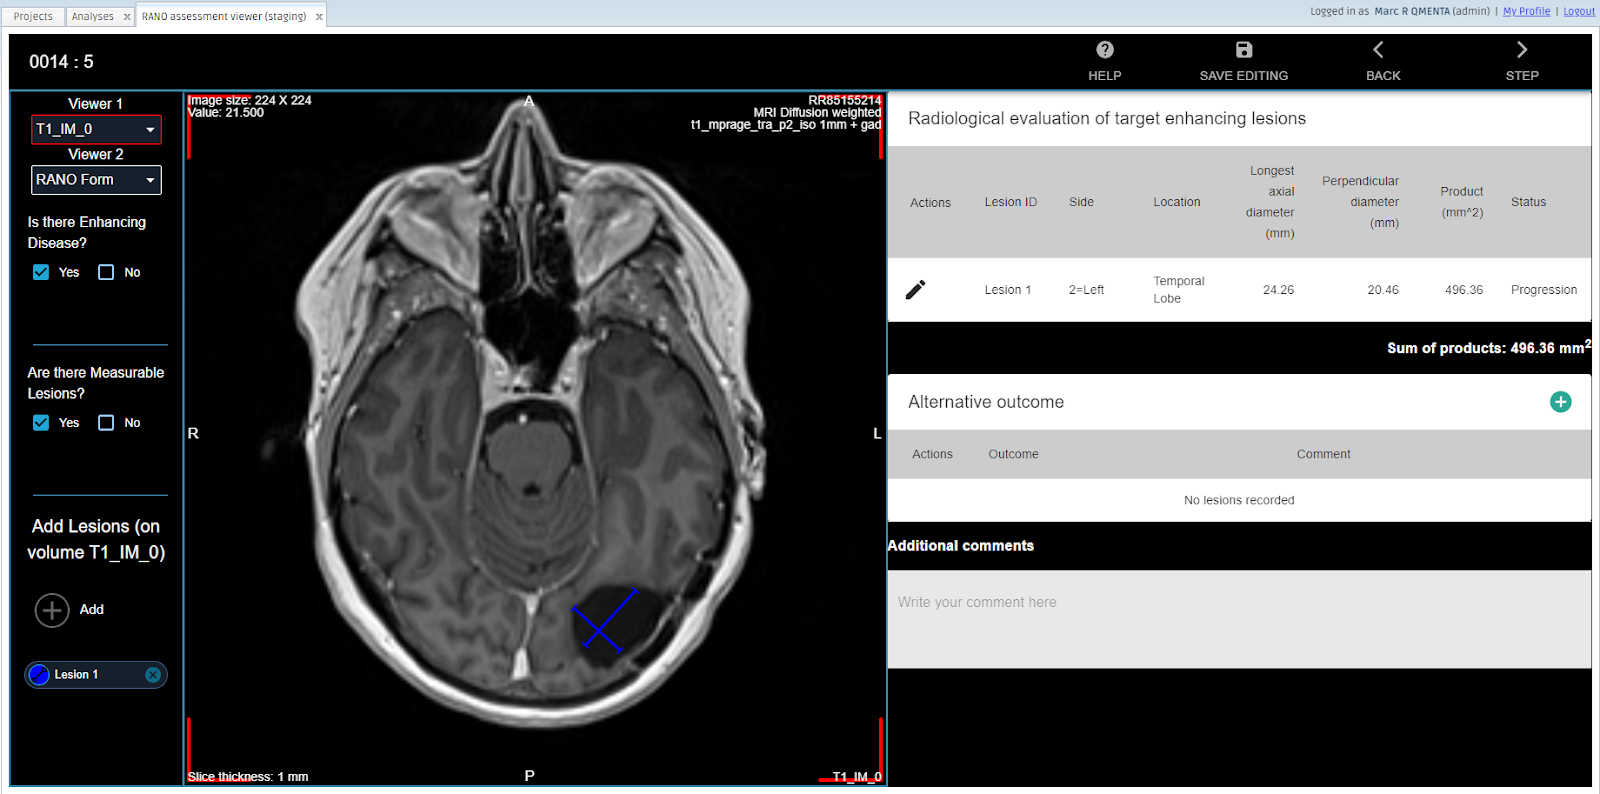
The brain lesions are measured using calipers. The calipers can be drawn on top of the MRI slices by clicking on the “Add” button on the bottom left corner. First, select the proper volume to do the assessment in the "Viewer 1" selector.
Find the proper slice where the caliper should be placed by using the mouse wheel and draw the caliper by clicking and dragging with the left mouse button. You can adjust the size and rotate the caliper to fit the lesion. A new row will appear in the RANO form at the same time. Also a new lesion is added in the lesion list on the bottom left. A maximum of five lesions are allowed to be drawn per scanning session.
After placing all the calipers on the lesions, complete the RANO Form fields on the right side by clicking on the pen icon. The form will be editable now. Select the options on the drop down menus. The numbers that appear on the form are the measures of your drawn calipers and are automatically generated.
When the form is completed and you are satisfied with your selections, click on the "SAVE" button. When all is completed click on the "STEP" button on the top right corner. You can also click on the "BACK" to return to the previous step if you forgot something that had to be done in the previous step.
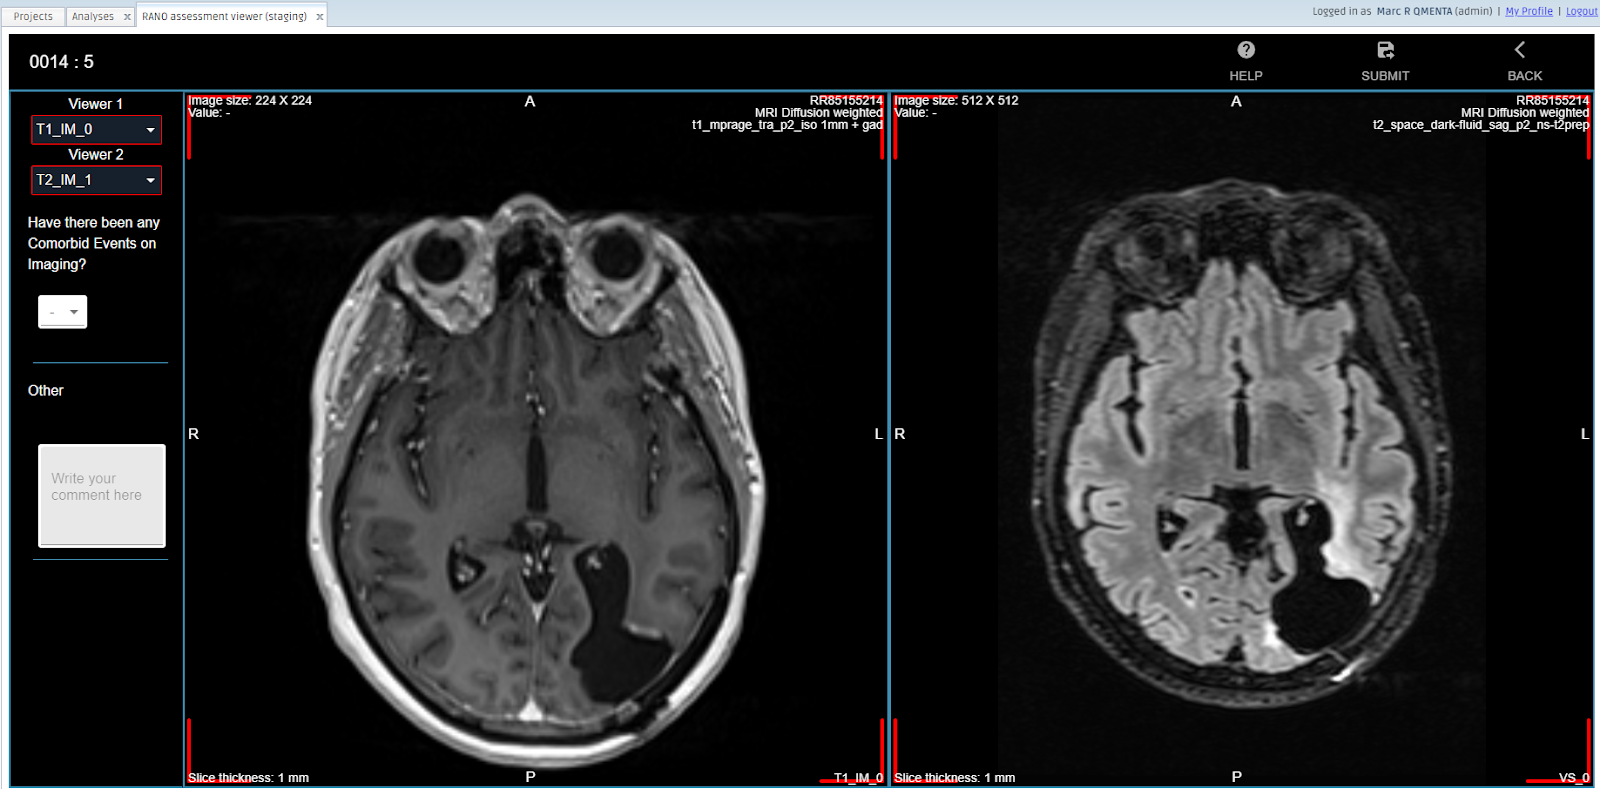
Co-morbities assessment
The third step consists of the assessment of co-morbidities. Select the MRI you want to visualize in the view selectors to properly assess your answer. Answer the question by clicking on the drop down menu and selecting the most appropriate answer from the list. The free text space in "Other" field allows the user to include any other assessment and will overwrite the dropdown selection.
This is the last step, if you think you have to modify any selection from the previous steps, you can navigate to them by clicking the "BACK" and "NEXT" buttons.
By clicking on the "SUBMIT" button you accept the changes and finish the assessment. The data introduced will now be processed and saved in the session’s metadata.
The workflow will continue and finish after the third step is completed.
3. Analyzing a follow-up session
The first and the third step of the RANO assessment tool when analyzing a follow-up session of a subject are working in the same way as the baseline session. We are going to focus on the second step, where the calipers are placed and the RANO forms are filled in.

Here, volumes of the current time point and the previous time point are loaded. The volumes from the current time point are shown with a red highlight in the corners of the view. The volumes from the previous valid time point will be highlighted with green in the corners of the view.
Now in the left view you are able to see the caliper drawn in the previous session as a static image. Then, select the current time point volume to perform the assessment as specified in the previous section and "SAVE" or "SUBMIT" your changes.
When submitting the RANO assessment, the tool will finish and the workflow will continue until all the steps are completed. The metadata values for the analyzed session are going to be updated by the tool using your inputs.
Accessing the analysis results and the final report
The report is presented in two formats: online and as an exportable PDF. Both contain the same information.
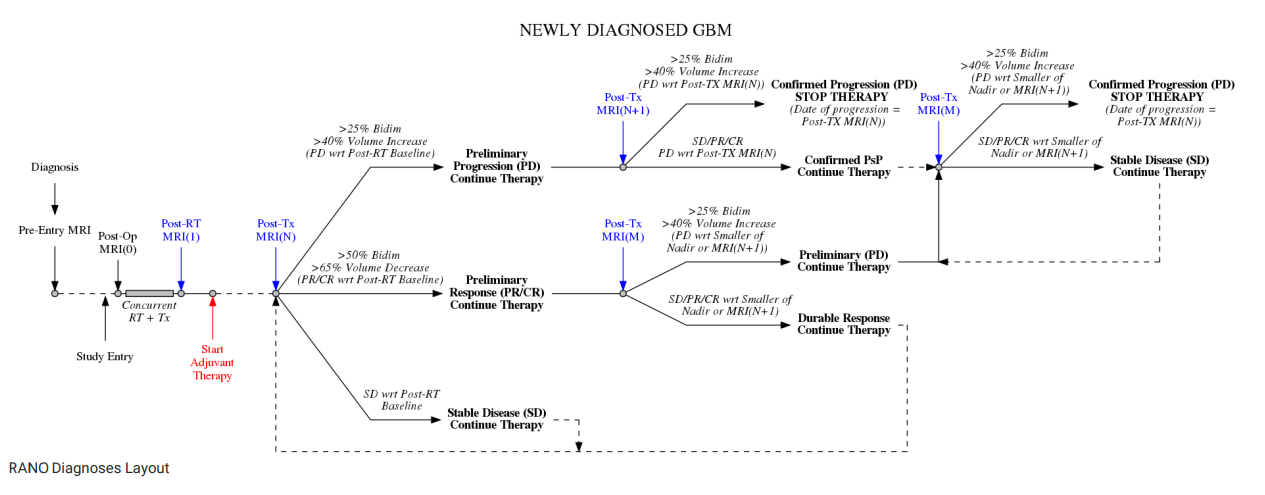
A diagram explaining the diagnosis is presented in the beginning of the report.
Then you can see a plot of the SPPD (Sum of Perpendicular Diagonals) evolution for that subject since baseline. On the x axis you can see the days that have passed since baseline. On the y axis you can see the SPPD value.

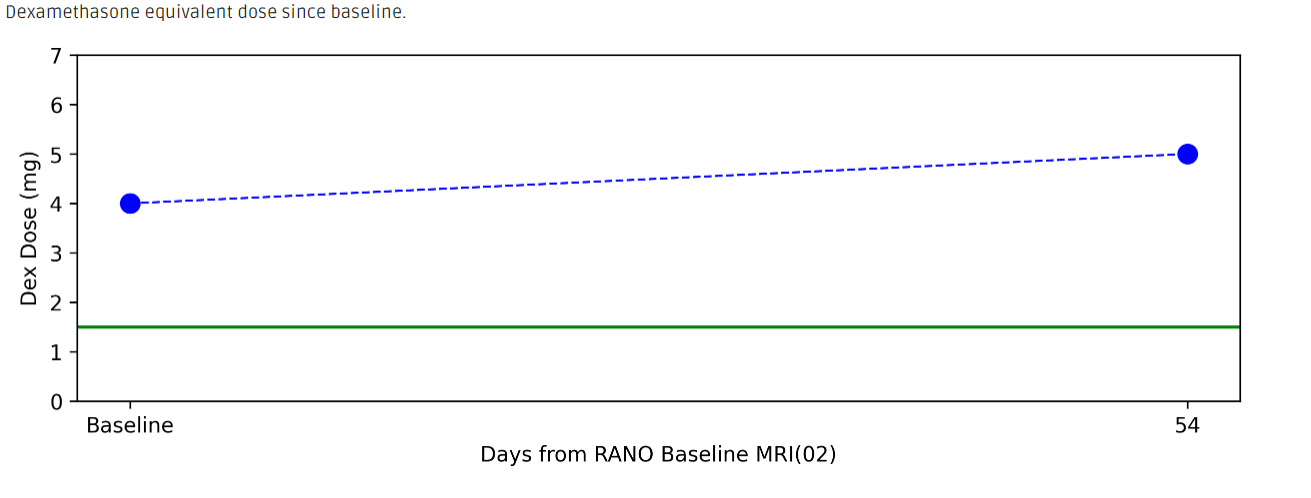
A plot for the equivalent dose since baseline is shown afterwards.
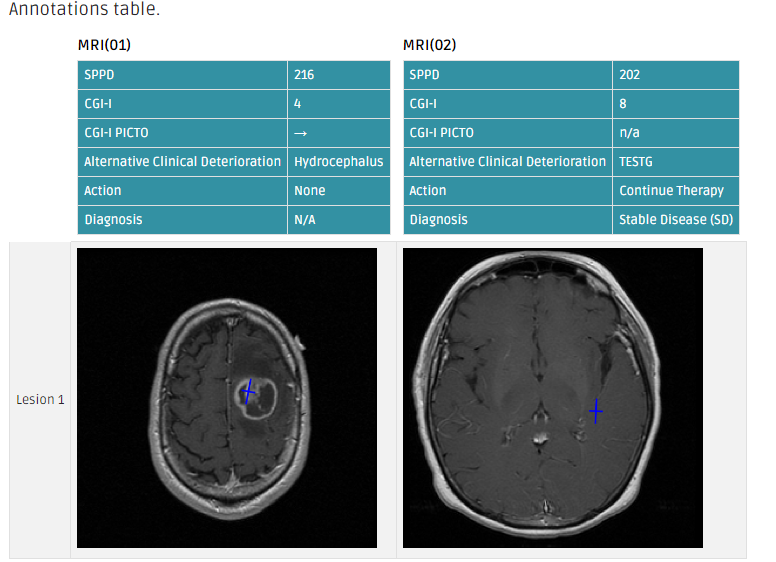
A final table shows the caliper placement and the evolution of the different parameters for the subject. Each new row will represent a new lesion, and each new column will represent a new session.
Further reading:
Ugonma N, Chukwueke and Patrick Y Wen (2019) Use of the Response Assessment in Neuro-Oncology (RANO) criteria in clinical trials and clinical practice. CNS Oncology
Mithun G. Sattur, Michael A. Vogelbaum (2016) RANO Criteria: Application to Response Assessment in Clinical Trials. Handbook of Neuro-Oncology Neuroimaging
Dewen, Yang (2015) Standardized MRI assessment of high-grade glioma response: A review of the essential elements and pitfalls of the RANO criteria. Neuro-Oncology Practice
Create your free account now!