This tool allows for semi-automatic and manual correction/editing of lesion masks. False positive and false negatives may be marked and their respective masks automatically deleted/generated. Additionally, fully manual lesion correction may be done through the painter feature.
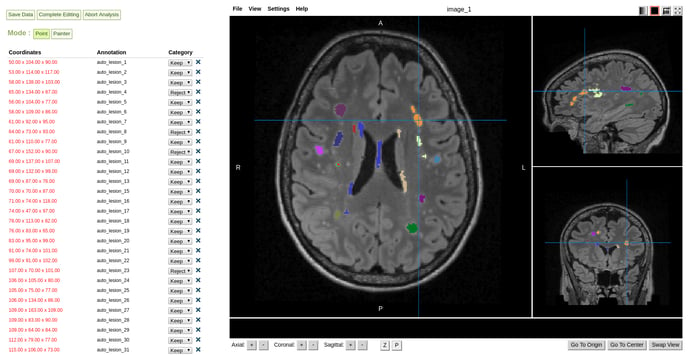
View of the cleanup tool with lesion mask overlay and pre-loaded lesions markups on the left
Usage:
This tool allows for QC and correction of pre-computed lesion segmentation masks. It has two main modes: semi-automatic coordinate-based correction, or "Point" mode, and fully manual lesion editing, or "Painter" mode.
The tool consists of a multi-planar viewer on the right side (see Multi-planar neuro-radiological viewer), an editing-markup list on the left side, and save/mode control buttons on the top.
-
Point mode:
This is the default starting mode and provides semi-automatic curating of the lesion mask by allowing the user to mark false-positive and false-negatives and automatically adding or removing lesions mask on the marked coordinates.
If pre-computed lesion coordinates were provided by the workflow, a set of coordinate markups will be readily available on the editing-markup list on the left. Coordinates in the mark-up list can be added a personalized annotation message, and assigned a category: "Keep" or "Reject". Kept lesions will continue in the mask after the manual review is completed, rejected lesions will be considered false positives and will be eliminated from the mask. Pre-loaded coordinates have the "Keep" default category.
- New coordinate mark-ups can be created on the main slice view by pressing Shift+Left-click on the desired location. If the location rests within an existing lesion mask, the coordinate will be colored red (as with pre-loaded coordinates) and the default category will be "Reject". If the location rests outside the lesion mask, it will be considered a false negative, the coordinate markup will be colored green, and the only category assigned will be "Add". A lesion mask will be automatically grown from this coordinate following image intensity gradients (alternatively when selecting the appropriate setting at the start of the workflow, a single voxel mask will be added to the desired location instead of automatic mask growth. Contact QMENTA support if you desire this behavior in your workflow).
- Marked locations might be deleted by the user by pressing the "X" next to the category selection box. If no markup is assigned to a particular lesion, the corresponding lesion mask will be kept after the stage is completed.
Once the manual stage is completed, additional metadata fields will be added to My Data view, a False Positives column will show the number of rejected lesions, and a False Negatives the added ones.
- Painter mode:
In this mode slice-per slice fully manual modification of the masks may be carried out.- In order to erase voxels from an existing mask, select the Color code: 0 (default). Then press and hold shift while you paint by left-click and dragging around the main view.
- In order to add voxels to an existing mask, first check the mask ID by putting the cross-hairs/cursor over the desired lesion and looking at the ID value at the bottom of the main view. Input this ID as color code, and then paint by shit+left-click.
- In order to create a new mask, select a high-value as color code (so that it does not correspond to an existing lesion) and paint in the same way as described above.
Once the desired editing has been completed, you may follow three paths by pressing the corresponding control button:
- Save Data: This will save all the current edits but will not finalize the editing session. You may safely exit the tool and the platform and come back at a later time to complete the editing process, several users might contribute in the same editing session this way.
- Complete Editing: This will finalize the editing session, the desired changes will be applied/computed over the masks, and the analysis workflow will continue. This view may be later revisited to explore the exact edits / changes that were made, but they may not be modified further.
- Abort Analysis: This will abort the current session, and permanently terminate the corresponding analysis. Press this only if the QC was considered failed for some reason, and the image is not fit for further processing.
Inputs / Outputs
- Required inputs:
- T2: FLAIR-weighted anatomical 3D image, from which the lesions were segmented.
Must be labeled as 'T2' modality - Lesions: segmented lesions mask.
Must labeled with "lesions" tag.
- T2: FLAIR-weighted anatomical 3D image, from which the lesions were segmented.
- Optional inputs:
- Lesion coordinates: list of pre-computed segmented lesion coordinates.
- Lesion coordinates: list of pre-computed segmented lesion coordinates.
- Outputs:
- Images:
- lesions_clean_up.nii.gz: final corrected lesions binary mask
-
lesions_labels_clean_up.nii.gz: final corrected lesions labels image, where each lesion volume has a numerical ID assigned.
Typical execution time:
-
<1 minute (after editing completion).
Create free account now!